Mehdi and I recently did our own little photobooth photoshoot in order to create our wedding website. Doing this on your own was easier than I thought and it definitely saves you so much money! This project is fun, simply and easy!

What you’ll need:
- Cardstock or scrapbook paper
- Home printer with ink and paper
- Tape
- 3/4 inch natural wooden beads
- Colored twine
- Scissors
- Glue
- Full roll of wrapping paper or solid/design cloth (5X4 ft or larger)
Instructions:
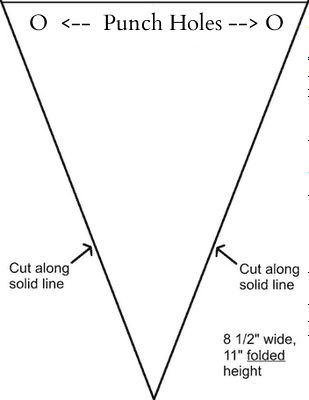
Step 1: Use the template of triangular shape, print it out, and cut out 5-6 triangles. Do this once on white printer paper and trace over cardstock/scrapbook paper or print directly on.

Step 2: Punch holes as directed on cutout and pull colored twine through holes to create the banner

Step 3: Cut wrapping paper or colored/design cloth (5X4 ft or larger depending how big you want your backdrop) and tape the edges to a spacious wall (I used a chevron print wrapping paper roll as seen below)

Tip: Try using a matte type paper so the wall won't glare when taking the photos
Step 4: Tape your banner to the top of the backdrop
Step 5: Use the
template of various shapes, print out, and cut out on colored cardstock paper
Step 6: Lay your cardstock side up and glue the top of the wooden skewer to the cardstock
Step 7: Make sure your props are satisfactory by testing them out in the mirror, you can also buy your own props
Step 8: Pose in front of the photobooth and snap your pictures!
Step 9: Optional - edit your pictures and post on your website
Here are some of our pictures:


Another example from our website:

This is a great and inexpensive way to create photos for your wedding (Save the Dates, Engagement photo session, website, etc.). It was also a fun experience because we were just goofing off while catching it all on camera. Hope you all can use this for your wedding or any other event.
xoxo,
Dora D.



 Hello. My name is Dora. This is my space for scribbles, for things that are pretty and inspire me. I love design and art, travel and cities, fashion and creativity!
  I'm Athena


